Friday, December 28, 2012
Day 2: Getting to know the Potentiometer
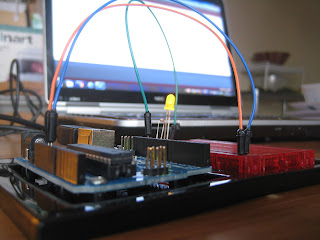
I think the last time I actually built any kind of circuit was in my freshman year physics class in college (8 years ago). Unsurprisingly I've forgotten almost everything. Today as I started circuit number 2 in my SparkFun Inventor's Kit I was faced with a component called a potentiometer (or variable resistor).

This little fella here basically has three pins and a little knob on the top that you can rotate and is described in the SparkFun guide as a knob that can raise and lower resistance, like a dimmer switch or a volume knob. The two outer pins connect to the power and the ground, and the central pin which is the output. It seems that in general, the way that these things work is that a connection is made between some sort of resistive material (apparently graphite in cheap potentiometers) organized in an arc and the power. By turning the knob on the potentiometer, you adjust the amount of resistive material between the power and the output by moving the second contact to a position further on the arc. This site explains it far more clearly than me. It's a surprisingly simple and elegant design... and I always thought that the inner workings of any of these things would be impossible to understand!
The second project in the kit involves setting up the potentiometer so that it can adjust the speed of the blinking of an LED, and getting this to work was surprisingly simple. Basically I made two circuits. One of the circuits is between the arduino and the LED, and the other is between the arduino and the potentiometer.

It's at this point that the manual discusses some crucial aspects of the arduino board: analog and digital pins. Basically, the analog pins take a value between 0 and 5 volts and translates them into a number between 0 and 1023 (more on this later). The digital pin is for dealing with values of things that are either off (0 volts) or on (5 volts) like say a blinking LED.
Now the code:
int sensorPin = 0;
int ledPin = 13;
void setup()
{
pinMode(ledPin, OUTPUT);
}
void loop()
{
int sensorValue;
sensorValue = analogRead(sensorPin);
digitalWrite(ledPin, HIGH);
delay(sensorValue);
digitalWrite(ledPin, LOW);
delay(sensorValue);
}
If you are unfamiliar with Arduino code, this might look complicated but it's actually pretty straightforward, especially if you know some programming. Here are the key lines:
sensorValue = analogRead(sensorPin);
This reads the value from the potentiometer and sets it to a variable called sensorValue
digitalWrite(ledPin, HIGH); This turns on the LED
delay(sensorValue); This keeps the next line from running for sensorValue milliseconds
digitalWrite(ledPin, LOW); This turns off the LED
delay(sensorValue);
That's it. Just read in the value of the potentiometer and turn the light on and off delaying by the returned value from the potentiometer. It's really surprising to me that such a simple set of code could get this done. I was expecting it to be much more complicated, but perhaps that is why arduino is so popular.
Thursday, December 27, 2012
Day 1: Opening the Sparkfun Inventor's Kit
My wife, Victoria, was kind enough to purchase the Sparkfun Inventor's Kit for me for Christmas. This kit costs about $95 and includes an Arduino board for running programs, a breadboard for creating circuits, and a variety of things like motors, sensors, and LEDs to hook up in a circuit. It also comes with a very nice manual with some basic projects. The code for the projects which can be uploaded to the Arduino are available online.
It's a nice kit that comes with a nice plastic box to keep everything in. Fancy eh?

Everything in the box comes in nice little labelled pouches. All you have to do is attach the Arduino and the breadboard to the little plastic dish they give you. Below are the contents of the package.

Setting up the Arduino with my computer could not have been easier. Just follow some simple instructions on the Arduino website. I was up and running my first program in about 10 minutes. Since the Arduino was powered by the USB port connected to my PC, there was no need to hook up batteries or anything. Once all the drivers were installed, I followed some of the simple instructions for the first circuit presented in the Sparkfun manual. It's a simple circuit that creates a blinking LED light.
 As you can see, the instructions are accompanied by very clear and helpful illustrations and explanations. After setting up the circuit, I opened up the provided code which was also very clearly annotated. I hit upload and boom! Blinking LED!
 By adjusting the program a little bit, I was able to adjust the speed of the blinking. Simple but fun. Who knew a simple little blinking light could bring so much joy! And thus ended my first day of playing with my new Arduino.
It's a nice kit that comes with a nice plastic box to keep everything in. Fancy eh?

Everything in the box comes in nice little labelled pouches. All you have to do is attach the Arduino and the breadboard to the little plastic dish they give you. Below are the contents of the package.

Setting up the Arduino with my computer could not have been easier. Just follow some simple instructions on the Arduino website. I was up and running my first program in about 10 minutes. Since the Arduino was powered by the USB port connected to my PC, there was no need to hook up batteries or anything. Once all the drivers were installed, I followed some of the simple instructions for the first circuit presented in the Sparkfun manual. It's a simple circuit that creates a blinking LED light.


What this blog is about
After graduating from college in 2007, I had a miserable time. I was left with a stellar education in economics without a passion to apply it to. I worked for two years at a consulting company. The salary was good, but the work was paradoxically mind numbingly boring and stroke inducingly stressful. I sat around wondering if my life was simply going to be sitting in an office working on spreadsheets at all hours of the day while occasionally solving a business problem that captured an extra 1% of a billion dollar market for a client. I couldn't have cared less, but I was also stuck.
After two years, I thought maybe I would give graduate school a try. I worked at a cognitive psychology lab for two years surrounded by kind, generous, and interesting people. I ran experiments and read academic papers. I sat in on seminars and lab meetings. I became quite fascinated and proficient in the science of decision making and negotiation. I was even lucky enough to be a teaching assistant for a couple of classes. Still, I knew that the academic lifestyle wasn't for me. The work that academics do is often highly important, but for me, it lacked a certain practicality. The results that our lab created were not something that I could hold in my hand.
After two more years, I took an opportunity that had been staring me in the face for a while. A little over 50 years ago, my grandfather started a small machine tool shop in Iwata, Japan. My mother had been running it for about 20 years but she wanted to retire. I had nothing to lose and thought, why not? I'd always been interested in entrepreneurship and working at this factory would be a gentle introduction where I wouldn't have to worry about start-up capital or finding new business immediately.
For the first year, I worked exclusively inside the factory. I learned to operate a manual lathe, a drill press, a manual milling machine, a cylindrical grinder, and a surface grinder. I'm by no means an expert but I understand what goes into it. After a year, I moved into management where my family has given me basically free reign to implement ideas.
It's been a year and a half since I started at the factory, and now I'm completely hooked. I love the process of production. I love making stuff. I love the technology of manufacturing. I love reading blue prints. What a difference time makes. Where once I was depressed and without passion, now I'm brimming with enthusiasm. Where I once dragged myself out of bed every morning, I now wake up excited for the day ahead.
I love making stuff so much that I've recently decided to take it up as a personal hobby as well, with the hope that someday my personal hobby and my professional job will merge into one. I'm creating this blog to document this process. As I have mentioned I have a year of experience working with metals, but I have no experience with electronics, and have only recently dipped my toes into the world of CAD. I hope that over the years, this blog will serve as a record of my progress as well as help to anyone who might be interested in taking their ideas and turning them into objects.
I know that this is a first post and that no one will read it, but I also know that it's important to define a mission and stick to it. This is what I have for now:
A74S4TP7DWAW
Subscribe to:
Posts (Atom)